Showing posts with label hands on activity. Show all posts

Sunday, October 11, 2020

Halloween & Fall Fun-Introduction to 5 & 10-Frame

Welcome to My Blog Post

  Halloween & Fall Fun 

The Introduction to the 5 & 10-Frames

Turn over a number and find the frame

Check out more products in my TPT store, Make Math Magic

I'd love to share a fun Halloween and 10-frame idea with you.
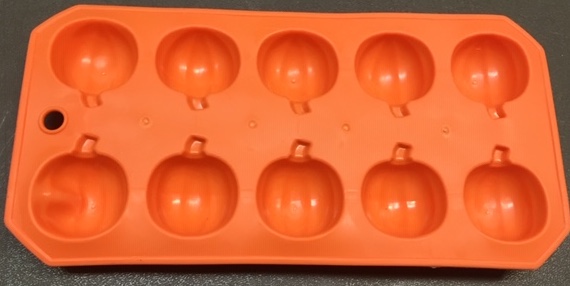
Pumpkin 10-Frame
I have experimented with different activities to introduce my kindergarteners to how and why to use a 5-frame. Some students had difficulty connecting the concrete idea with more abstract unit frames, and thus, engagement wasn't as high as I wanted.

This posting outlines my latest and most successful (so far) way of introducing the 5-10 frames concept. The 10-frame is a useful strategy and will assist the understanding of decomposing numbers and addition activities.

I found these fun pumpkin ice cube trays at the Dollar Tree-of course, for $1.00 each. It seemed like they would be much more engaging for a beginning introduction lesson than the usual cut-apart egg cartons I had been using.

Use to introduce a 5-frame
Firstly, I start with the idea of the 5-frame, so I cover up the bottom 5 in the '10 frame'. Tape a piece of paper over the bottom part so only the 5-frames are visible. Get your students familiar with the order of the frame spaces. Start at the top left and move to the right-exactly as reading a page in a book.

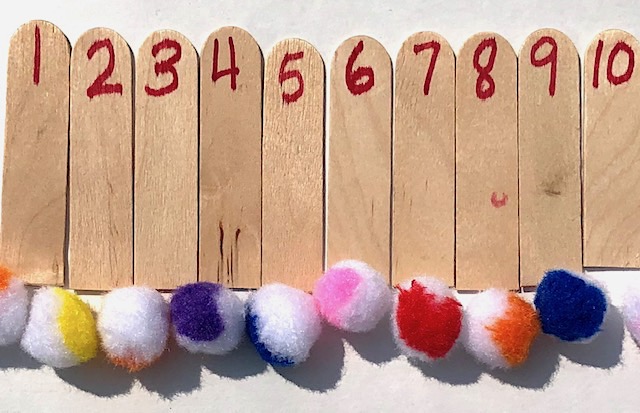
At this point, only give each student the numbered sticks 1-5. Turn each number stick face down, so they see the sticker and not the number. Select one number stick and turn it over. Whatever the number, count that may spaces

Use 5 or 10 numbers for your frame
in the 1-5 frame. Counting by 1's, place a pompon in each area until you have that many spaces filled. Suppose you turn over a 4, count to 4, and set a pompom in each frame. Clear the spaces and select another number stick.

Compare With Pumpkin 5-frame
Continue until all the sticks have been turned over. To help make a connection and better understand the more abstract 5-frame, display the 5-frame to your students.

Start a discussion comparing the ice cube tray frame and the 5-frame. What do your students notice? There have been occasions that I have asked students to use their journals to briefly write what they observed.

Once you believe your students understand the concept and purpose of the 5-frame, take the tape off the tray, so students see all the 10 spaces. Demonstrate how to use the bottom row-same as the top row-start left to right (again like reading a page to 10 with the 10-frame.

You may want to display this 10-frame on the board. Have students discuss with a buddy how the 10-frame is like the 5-frame. How are they different? Write their responses on the board as an extra visual.

Once you believe your students understand the concept and purpose of the 5-frame, take the tape off the tray so students see all the 10 spaces Demonstrate how to use the bottom row-same as the top row-start left to right (again like reading a page to 10 with the 10-frame.

Turn over a number stick
Compare to Pumpkin 10-frame


Using the pumpkin 10-frame, give the students 10 pompons and all 10 numbered sticks. Play the 10-frame number game as you did the 5-frame, by turning over a number, one at a time. Counting by 1's, place a pompom in each space for that number.

Stickers on the back of each stick
               
Suppose you turn over an 8. Fill in the top row and immediately go to the bottom row-again left to right.   Clear the spaces and select another number stick until all the numbers have been turned over. It will be easy for students to quickly clean up the activity if they check the back stickers to ensure they are all the same design. Place the sticks with the same stickers in baggies or other containers for other uses. In the next blog, I will discuss how I use the same materials to add and subtract.

Stay tuned!


Sunday, June 23, 2019

Subtraction From 7-Make Your Own Mini-Booklet


Welcome to my blog post!
Subtraction from 7 - Mini Booklet

Subtraction is often difficult for young children. At the beginning of the concrete process, it is helpful to use a variety of hands-on manipulative so your students can visually see and touch the objects during their learning. This activity is easy to prepare and small manipulative are not difficult to gather. Small objects purchased from a store as, The Dollar Tree and 99¢ Store are great to accumulate for many activities.

These are some of the items I have used. Easy to acquire!


This subtraction mini booklet idea can be used for any number and I made this one as my students were having difficulty with 7’s.
First, collect the following:
      *Small salad dressing containers from one of the stores mentioned above. They come in a package of 12. I like them because they are clear and easy for students to see through them.
     *As an alternative, thoroughly clean prescription bottles and put a large sticker on the cap, so it is not obvious what type of container it is.
     *Put 7 identical objects in each container. They can vary with color but the identical objects seem to be less distracting to my students. *If you are using another number, place that many objects in each container.

*For this lesson I used paper clips (2 colors), mini pompoms, erasers, same color buttons, and foam transportation shapes. 


If you want to have more students participate at one time, increase the number of containers with same or different objects.


Place the containers and the booklets in an accessible area. Often the students like to redo the activity with a different object or complete it with a partner. I like to add blank pages to the booklet, as some students love to draw the objects and write their own subtraction equation.


Below is the direction page from the booklet. It gives step-by-step easy directions of how to get started. An answer key is included.
Click on the pages of the booklet to print for your own. An answer key is included.


A big thank you to Whimsy Clips for the cute kids on the cover of the booklet.

Contact Form

Name

Email *

Message *